Flow layout document option
- Former user (Deleted)
- martinajindrova
- Martin Haluza
Word documents, RTF documents, OpenOffice Writer documents and OpenOffice Calc documents have two output options – “Absolute positioned layout” and “Flow layout”. The generated documents often look the same, but the algorithms behind these options are completely different. The absolute positioned layout always looks like the original report, but is hard to edit and bigger in size. The flow layout may not always look exactly the same, but it is a 'real' Word document - easily editable, with styles, page headers and footers, paragraphs and tab stops, which is also shorter in size and faster to open.
Each of the output options have its own parameter code that is sent at the 7th parameter (targetType) of the SetParams method:
Document type | targetType parameter |
Word document with absolute layout | DOC |
Word document with flow layout | FDOC |
RTF document with absolute layout | RTF |
RTF document with flow layout | FRTF |
OpenOffice Writer document with absolute layout | ODT |
OpenOffice Writer document with flow layout | FODT |
OpenOffice Calc spreadsheet with absolute layout | ODS |
OpenOffice Calc spreadsheet with flow layout | FODS |
This chapter describes the Flow layout output option – how it works and how it differs from the Absolute positioned layout.
Running the conversion
Flow layout Word option is implemented as a new target type, so simply send “FDOC” as the tcTarget parameter of the SetParams() method.
How it works
The logic is similar to the way how plain text option works. During the generation process, XFRX takes each section – one by one – and tries to split it to individual lines. Then each line is added to the output, respecting the vertical position of the line on the paper and horizontal positions of individual objects. Vertically misaligned objects are moved down to the closest baseline.
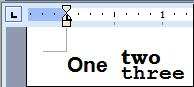
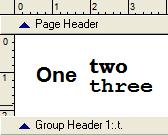
Example 1
This report definition:
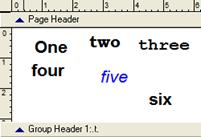
will be split to three lines and the resulting document will look like this:
(download example1.doc)
As you can see all objects are aligned to the same baseline and the horizontal position is set by a tab stop (left, right or center, depending on the field’s alignment). If you add any graphics or pictures, these are added to the document and linked to the paragraph it starts at, so if you add contents above the graphics, it will move down along with the corresponding paragraph.
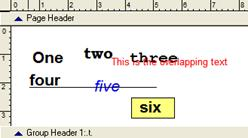
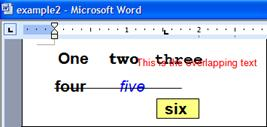
If XFRX cannot create distinct lines or if the text objects overlap one another, the overlapping text object is placed at the exact position as a textbox.
Example 2
| >> converts to >> | (download example2.doc) |
Page headers and footers
Page headers and footers defined in the report are converted to page headers and footers in the Word document, so for example, if you add a line in the middle of a page, the page footer will not move to the next page header, but stay in place.
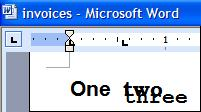
Deficiencies
Even though most reports are converted without problems, there are certain scenarios when the output wouldn’t look as expected. As stated above, all fields in one line are aligned to the same baseline. In some reports, this can cause a problem, for example:
| >> converts to >> | |
To do this, add “#UR POSITIONABSOLUTE” as a comment of these fields:
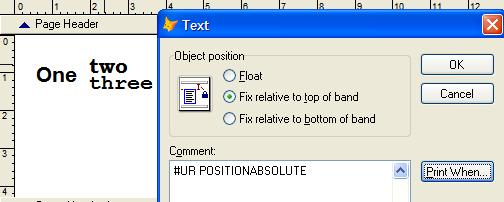
And the resulted Word document would be generated as: