General notes
The output to the Excel format is similar to the flow layout formats. The other formats use absolutely positioned textboxes for each report label or textbox, containing the generated text output. The XLS output, on the other hand, puts the generated text directly into the cells on the Excel sheet and sets the height of the rows and width of the columns to achieve the desired layout. Lines and rectangles, too, are added as cells' borders, rather than graphics over the sheet.
There are many advantages in this approach: the generated documents are smaller and much easier to be modified - all numeric fields can be used in calculations, it's no problem to add rows or columns, change cell attributes, etc.
There are, however, downsides, too: The fields cannot overlap, so something like this:
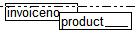
in the report won't convert correctly, and, as each Excel cell has a margin inside that cannot be suppressed, some fields might have to be made a little wider to accommodate the whole content.
With XFRX, the reports will probably need some tweaking, especially the complicated ones, but the result will be a normal Excel document, as if someone created it manually.
| Table of Contents |
|---|
How it works
XFRX makes use of the possibility to merge more Excel cells together. Wherever a label or textbox should start or finish, XFRX creates a row and a column. To achieve the best looking results, it is a good thing to align the labels and textboxes both vertically and horizontally - result of which is a clearer document with fewer rows and columns. (Please see more about this below, in How to achieve the best results? paragraph.)
Handling page breaks
By default, XFRX does not break pages in the XLS output the same way as in other output formats – it is run in the plain mode instead, which means the output is one sheet - as long as it needs to be, with a page header on the top and a page footer at the bottom.
| Info | ||
|---|---|---|
| ||
This behavior changes since XFRX 17.0. If you need old behavior for XLS you can set "internal" properties directly after calls SetParams() method:
|
If more reports are processed, each report creates one sheet in the output document.
There are two options you can use to modify the way the page breaks are handled:
Generating sheet per page
To enable this option, call SetOtherParams method to set the “SHEET_PER_PAGE” parameter to .T.:
| Code Block |
|---|
m.loSession.SetOtherParams("SHEET_PER_PAGE",.T.) |
This will switch off the “plain” mode and the page breaks will correspond to other output options. Each page will be generated as a new sheet in the Excel document.
Please see more information about the SetOtherParams method in Methods common in XFRXListener and XFRXSession classes reference
Generating sheet per start-each-group-on-a-new-page groups
To enable this option, call SetOtherParams method to set the “SHEET_PER_NP_GROUP” parameter to .T.:
| Code Block |
|---|
m.loSession.SetOtherParams("SHEET_PER_NP_GROUP",.T.) |
This option combines the plain mode and the sheet-per-page mode. The report runs in the plain mode but a new sheet is generated for each report group with “Start each group on a new page” flag set to .T.
Add page break in sheet
This options add page breaks in sheet by pages in report for XFRX#INIT + TransformReport() and XFRX#LISTENER (since XFRX 15.7).
| Code Block |
|---|
m.loSession.SetOtherParams("SHEETPAGEBREAK",.T.) |
Defining sheet names
There are two ways how to define sheet names. You can define a static text via NEXT_SHEET_NAME parameter, or you can use the NEXT_SHEET_NAME_EXPR parameter to define an expression, which will be evaluated at the bottom of each sheet and the result will be used as the new sheet name. The latter option is useful if more sheets are generated during one report run. Parameter ADDPAGENUMBERTOSHEETDISPLAYNAME (since XFRX 15.6) can suppress page number in sheet name.
Please see more information about SetOtherParams method in Methods common in XFRXListener and XFRXSession classes reference
Hiding the Excel sheet grid
The background grid is visible by default. To hide it, please set DISPLAY_GRID_LINES parameter to false:
| Code Block |
|---|
m.loSession.SetOtherParams("DISPLAY_GRID_LINES",.F.) |
Leaving the fields content in Excel cells
By default, the content of non-stretchable fields is cut according to the size of the field, but you can optionally leave the full content of the field in the Excel cell. To enable this option, set the LEAVE_FULL_FIELD_CONTENT parameter to .T.:
| Code Block |
|---|
m.loSession.SetOtherParams("LEAVE_FULL_FIELD_CONTENT",.T.) |
How to invoke the XLS output
It is pretty much the same as with the other targets:
| Code Block | ||
|---|---|---|
| ||
LOCAL m.loSession, m.lnRetval
m.loSession= xfrx("XFRX#INIT")
m.loSession.initLog()
m.lnRetVal = m.loSession.SetParams("output.xls",,,,,,"XLS")
IF m.lnRetVal = 0
   m.loSession.SetOtherParams("NEXT_SHEET_NAME","first") && the name of the sheet, optional
   m.loSession.ProcessReport("report1")
   m.loSession.SetOtherParams("NEXT_SHEET_NAME","second")
   m.loSession.ProcessReport("report2")
   m.loSession.finalize()
ENDIF |
This example creates a two sheet document. As you can see, SetOtherParams() method can be used to define the sheet names. If it is not called, the default names are "sheet1", "sheet2", etc.
XLS cells adjustment
When XLS document is generated, the vertical and horizontal coordinates of objects are adjusted - if the difference between two coordinates is smaller than a certain value, the coordinates are 'aligned'. This approach significantly reduces the number of rows and columns in the generated document.
It is possible to define this minimal difference. The greater the number is, the lesser number of rows/columns is generated, but if the number is too big, fields might get overlapped and could be left out.
Call SetOtherParams method with "HORIZONAL_ADJUSTMENT" or "VERTICAL_ADJUSTMENT" to define the minimal horizontal and/or vertical difference.
Example:
| Code Block |
|---|
m.loSession.SetOtherParams("HORIZONTAL_ADJUSTMENT",1000) && default value = 76
m.loSession.SetOtherParams("VERTICAL_ADJUSTMENT",1000) && default value = 180 |
How to achieve the best results
- Align the fields.
Have a look at the following document: (http://www.eqeus.com/xls1.xls)
Columns B and C are almost invisible (if you make them wider, you can see that customer names start at column B, "Customer List" starts at column C and "Customer" starts at column D - which is something that we don't notice in normal report but have better result in the XLS output if the fields are aligned), row 4 is very narrow, and between each customer, there's added a very thin row, too.
"Fixing" this is very simple - we aligned the "Customer", "Customer List" labels and the customer textbox, moved the line below the header a little bit higher so it lands on the cells below the "Customer" and "Total" captions. We also aligned the textboxes vertically.
The resulting document looks much better: (http://www.eqeus.com/xls2.xls) - Problem with label width
The size of a label cannot be modified in the report designer - it always takes the size of the text entered. However, as we mentioned before, the Excel cells have little margins inside, so if we create a cell as wide as the label and put the text into it, the whole text wouldn't fit in - the last character or two disappear!
XFRX takes care of this and makes the cell a bit wider, but this can bring another problem - if there is another label or a text field near the right edge of the label, increasing the width can result in overlapping the other label or the text field, result of which would be that one of the two labels disapper (there can be only one thing inside the cell). So please be careful about this and make sure there is enough space between the labels. Variable labels widths
As the width of the label depends on its content, we cannot align both right and left edges of more labels and sometimes it might be better to replace labels with textboxes. For example, if there are many labels in a column, all left aligned like this:
When creating the Excel document, XFRX will create a column for the right edge of each label: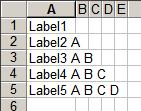
However, if the labels are converted to textboxes, we can align them: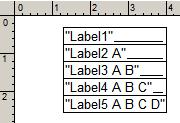
And the result might look better: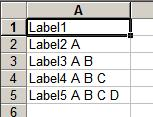
It is actually quite easy to convert all labels to textboxes, just open the report in FoxPro and replace the object type:Code Block USE report.frx REPLACE objtype WITH 8 ALL FOR objtype = 5 USE
Numeric field picture format in Excel
The format definition of numeric cells in Excel is different from the format syntax used in Foxpro. XFRX is now able to convert the simple format definitions and allows for user-defined implicit and/or explicit Excel-type format definitions.
In Visual Foxpro, the numeric field is converted to its text representation based on an explicit format definition (format field in the report expression definition) or field's decimal places and SET DECIMAL setting.
| Note |
|---|
Do not forget set value of property CallEvaluateContents to 2 if you want export numbers as numbers at using XFRX#LISTENER: m.loSession.CallEvaluateContents=2 |
When a numeric field is transformed to an Excel cell, the following algorithm is used:
- If there is an explicit XLS format defined, use it.
To define an explicit XLS format for a numeric field, add:
#UR XLSF= (expression)
to the field's comment.
Example 1:
#UR XLSF="General"The "General" formatting - no special formatting, the number of decimal places is determined by the field's value
Example 2:
#UR XLSF="Standard"
The "Standard" formatting - two decimal places, thousand and decimal separators will be used according to the Excel defaults
Example 3:
#UR XLSF="#0.00"
Two decimal places, no leading zeros
Example 4:
#UR XLSF="#0.00;[red]#0.00"
Two decimal places, display negative numbers in red
- If the field contains a format definition, try to look up the format in a conversion table.
A conversion table can be populated programmatically when XFRX is executed so that the formats that are often used and cannot by converted automatically by XFRX would not require an explicit definition in each field in the report.
To add an entry to the conversion table, use addXLSFormatConversion method of XFRXSession class.
Example 5:
Code Block m.loSession.addXLSFormatConversion("@L 999999.99","000000.00") - If the field contains a format definition and it is not listed in the conversion table, try to convert it.
XFRX is able to convert simple format definitions containing the following characters: '9', '#', ',', '.' and ' '. For example, 999,999.99 is converted to ###,###.00.
If the format cannot be converted, use the implicit XLS numeric format, if available.
To define the implicit XLS numeric format, call setDefaultXLSFormat method of the XFRXSession object with the implicit format as a parameter.
Example 6:
Code Block m.loSession.setDefaultXLSFormat("General") - If the implicit XLS numeric format is not defined, XFRX creates a format definition to display the same number of decimals as in VFP report output.
If you want to specify that a certain numeric field should be converted as a text cell in the excel sheet, define "TEXT" as its explicit XLS numeric format:
#UR XLSF='TEXT'
For a live example of formatting the Excel cells, please have a look at the "XLS formatted numeric cells sample" report in the demo application.
Plain output (XLSPLAIN)
The Excel plain output format is an alternative output to Excel that aims to provide cleaner as well as smaller Excel documents. The following are the key differences from the standard Excel output:
Each report is generated as a single sheet with a single page header at the top of the document and a single page footer at the very bottom. The header/footer sections are not inserted inside the report where the pages would normally break.
The process eliminates empty columns and rows whenever possible.
The report layout is automatically adjusted to eliminate narrow rows and columns.
- HORIZONTAL_ADJUSTMENT and VERTICAL_ADJUSTMENT are no longer needed. The system analyzes the report layout on the fly and identifies the places where objects can be aligned without affecting the final output.
To invoke the Excel plain format, send "XLSPLAIN" string as the output type parameter. Example (VFP 9.0):
| Code Block | ||||
|---|---|---|---|---|
| ||||
LOCAL m.loObj, m.lnRetVal
m.loObj = EVALUATE([XFRX("XFRX#LISTENER")])
m.lnRetVal = m.loObj.SetParams("test.xls",,,,,,"XLSPLAIN")
IF m.lnRetVal = 0
   REPORT FORM demoreps\invoices OBJECT m.loObj
ENDIF |
MS Excel 2007 Output (NATIVE_FXLSX/ NATIVE_PFXLSX)
To invoke the Excel 2007 format, send "NATIVE_FXLSX" or "NATIVE_PFXLSX" string as the output type parameter. Example (VFP 9.0):
| Code Block | ||||
|---|---|---|---|---|
| ||||
LOCAL m.loObj, m.lnRetVal
m.loObj = EVALUATE([XFRX("XFRX#LISTENER")])
m.lnRetVal = m.loObj.SetParams("test.xlsx",,,,,,"NATIVE_FXLSX")
IF m.lnRetVal = 0
   REPORT FORM demoreps\invoices OBJECT m.loObj
ENDIF |
Developer Folder for NATIVE_FXLSX/NATIVE_FXLSX
Call SetOtherParams method with "DEVELOP" or "DEVELOPFOLDER" to define output folder for source files and folders of OpenXML.
Example:
| Code Block |
|---|
m.loSession.setOtherParams("DEVELOP",.T.)
m.loSession.setOtherParams("DEVELOPFOLDER","[FOLDER\]DEVELOPFOLDER") |