1. Download and unpack the client API package
- The client API code is available on a free Bitbucket public GitHub repository at https://bitbucketgithub.orgcom/eqeuscom/ricsamplesRICSamples.
- Please go to download the package from https://bitbucketgithub.orgcom/eqeuscom/RICSamples/ricsamples/downloads and click "Download repository". archive/RICSamples_v1.1.zip
- Unpack the zip package into an empty folder
| Info | ||
|---|---|---|
| ||
The client API package contains the following:
|
2. Create a new organization
Open AddNewOrganization2. Edit and run the demo application
- Open RICDemo.prg in VFP. In the "PARAMETERS" section at the top, enter in your At the top of the program, replace XFRX_CUSTOMER_NAME and XFRX_CUSTOMER_PWD constants with your XFRX customer username and password (this is the username and password you use to log in into www.eqeus.net/xfrx to download new xfrx versions)
- In the section below it, enter in the organization name you want to create, the subdomain it should run on, admin username and admin password.
- This sample program runs the API to add the organization and stores the organization details, including the admin user "secret" into the local secret dbf. This secret is used in the next step to upload a report.
3. Upload a report
- Open UploadReport.prg in VFP and enter in the organization subdomain at the top in the parameters section.
- This program runs a sample report that comes with XFRX, converts it into the XML format and then uploads it using the organization subdomain parameter and the secret stored in the secrets.dbf.
- Alternatively, leave this code as is and it will create a new subdomain with a random name.
- Run RICDemo.prg. The new organization will be created, users and folders will be created, a report will be uploaded and some report level and folder level propertes will be set up.
- Then the demo application will pause so that you can view the demo organization online.
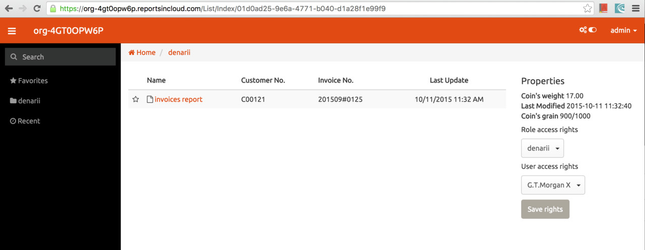
3. Open your report in the web browser
- Go to your new subdomain in reportsincloud.com (for example, if your subdomain is "my_test_123mytest123", go to https://my_test_123mytest123.reportsincloud.com
- Note: the RICDemo.prg puts the URL to the clipboard, so after you run it you can go to the web browser, select the address field and hit Ctrl+V.
- You will see the report you just uploaded in there.
- Here is a screenshot of what you should see m your screen:
4. Go to the administration console
- You can now go to the administration console at https://admin.reportsincloud.com and see the newly created organization there.
5. See how reportsincloud.com works for you.
- Give it a try. Add your report, add users, new domains
- During the beta phase, each tester is limited to:
- 10 users/domains quota (You can add up to 10 domains each with 1 user each, or 1 domain with 10 users, or anything in between)
- 50 MB uploaded report data per user
- 1 GB of download monthly per organization
- . Link RIC to your desktop application.
6. Please let us know what you think
- Please let us know what you think, what works and what doesn't or what features you are missing at support@eqeuseqeus@eqeus.com.
| Panel | |
|---|---|
On this page:
|